Featured post

Functionality of Segment Value Inheritance ESS Process

  The Segment Value Inheritance process simplifies the maintenance of the chart of accounts. When the characteristics of values in the value...

Monday 28 June 2021

GL_BALANCES


GL_BALANCES

  1. Summary

GL_BALANCES contains actual, budget, and encumbrance balances for detail and summary accounts.

This table stores ledger currency, foreign currency, and statistical balances for each accounting period that has ever been opened.

ACTUAL_FLAG is either ‘A’, ‘B’, or ‘E’ for actual, budget, or encumbrance balances, respectively. If ACTUAL_FLAG is ‘E’, then ENCUMBRANCE_TYPE_ID is required.

  1. Balances Calculations

GL_BALANCES stores period activity for an account in the PERIOD_NET_DR and PERIOD_NET_CR columns.

 The table stores the period beginning balances in BEGIN_BALANCE_DR and BEGIN_BALANCE_CR.

An account’s year-to-date balance is calculated as BEGIN_BALANCE_DR – BEGIN_BALANCE_CR + PERIOD_NET_DR – PERIOD_NET_CR.

Example

decode(map.account_type,’Asset’,greatest(sum(period1.begin_balance_dr + period1.period_net_dr)-sum(period1.begin_balance_cr + period1.period_net_cr),0),’Liability’,(greatest(sum(period1.begin_balance_dr + period1.period_net_dr)-sum(period1.begin_balance_cr + period1.period_net_cr),0)),q'[Ownership/Stockholder’s Equity]’,(greatest(sum(period1.begin_balance_dr + period1.period_net_dr)-sum(period1.begin_balance_cr + period1.period_net_cr),0)),null) “Ledger Debit Amount”,

decode(map.account_type,’Asset’,greatest(sum(period1.begin_balance_cr + period1.period_net_cr)-sum(period1.begin_balance_dr + period1.period_net_dr),0),’Liability’,(greatest(sum(period1.begin_balance_cr + period1.period_net_cr)-sum(period1.begin_balance_dr + period1.period_net_dr),0)),q'[Ownership/Stockholder’s Equity]’,(greatest(sum(period1.begin_balance_cr + period1.period_net_cr)-sum(period1.begin_balance_dr + period1.period_net_dr),0)),null) “Ledger Credit Amount”,

  1. Foreign Currency Transactions or Journals

Detail and summary foreign currency balances that are the result of posted foreign currency journal entries have TRANSLATED_FLAG set to ‘R’, to indicate that the row is a candidate for revaluation.

For foreign currency rows, the begin balance and period net columns contain the foreign currency balance, while the begin balance and period net (_BEQ) columns contain the converted ledger currency balance.

Summary foreign currency balances that are the result of foreign currency translation have TRANSLATED_FLAG set to NULL. All summary account balances have TEMPLATE_ID not NULL.

Example

For US Company whose functional currency is USD, and if transaction (AP Invoice) is entered is in INR. Here entered Dr and Entered Cr are in INR and Accounted Dr and Cr is in USD.  (Context is for Liability account)

In GL Balances there will be two rows for this liability account, one for currency INR and other for currency USD.

A row with INR (Foreign Currency) will have TRANSLATED_FLAG set to ‘R’. For foreign currency (INR) rows, the begin balance and period net columns contain the foreign currency balance, while the begin balance and period net (_BEQ) columns contain the converted ledger currency balance (USD).

A row with USD (Functional Currency) will have TRANSLATED_FLAG set to NULL

  1. Foreign Currency Translation

Detail foreign currency balances that are the result of foreign currency translation have TRANSLATED_FLAG set to ‘Y’ or ‘N’. ‘N’ indicates that the translation is out of date (i.e., the account needs to be re-translated). ‘Y’ indicates that the translation is current.

Summary foreign currency balances that are the result of foreign currency translation have TRANSLATED_FLAG set to NULL. All summary account balances have TEMPLATE_ID not NULL.

The columns that end in _ADB are not used. Also, the REVALUATION_STATUS column is not used.

Friday 18 June 2021

Rapid implementation in Oracle Fusion-How to create


Oracle fusion provides option to create rapid implementation for financial, SCM and some other modules .Some of the basic setup you can perform very quickly with the help of predefined spreadsheet template in Oracle fusion

today we will discuss how we can perform Rapid implementation in oracle fusion financial

With Rapid implementation functionality you can create

1.A chart of accounts, hierarchies, document sequencing
2.key account assignments, a fiscal calendar, account defaulting, and financial sequencing.
3 Primary ledgers and business units with assignment of all
4.business functions to use with your subledgers.

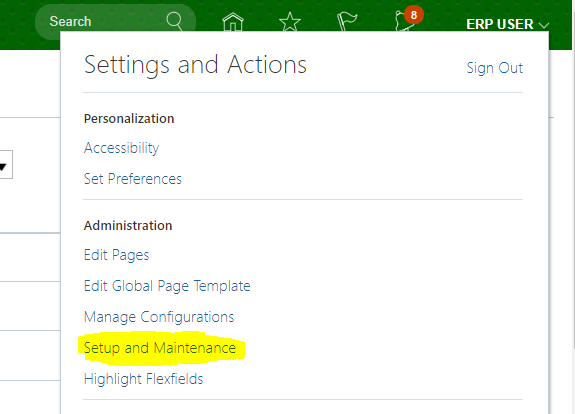
Navigate to –

Navigate to: Setup and Maintenance > All Tasks > Search > %Rapid Implementation%
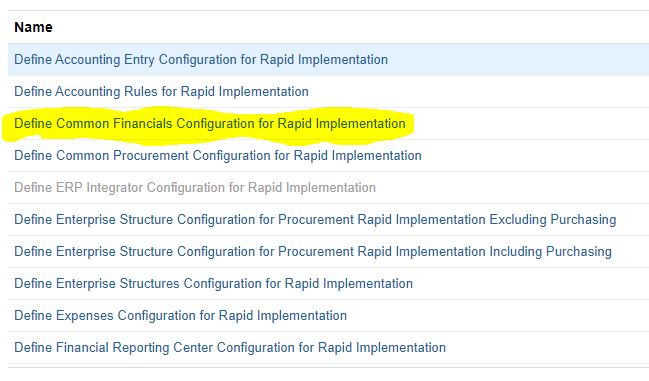
Search > Expand the Define Common Financials Configuration for Rapid Implementation

Rapid Implementation in Oracle Cloud ERP

> All Tasks > Search >

Rapid Implementation in Oracle Cloud ERP

Search > %Rapid Implementation%

in your search query you have to select the below option-Define Common Financial Configuration for Rapid Implementation

Oracle Cloud ERP and Oracle Fusion Financial

Once you click on this you have two option to create your rapid implementation. Two steps you need to follow here .First you need to create template and then need to upload the template to Oracle Fusion ERP

STEP 1-Create Chart of Accounts, Ledger, Legal Entities, and Business Units in Spreadsheet

Step 2-Upload Chart of Accounts

Step 3-Upload Ledger, Legal Entities, and Business Units

Oracle Fusion financial

In the first step once you click on create option -one Rapid implementation spreadsheet template will be downloaded. In this template you to create with all your setup data and convert this to a CSV Files

Rapid Implementation in Oracle Cloud ERP

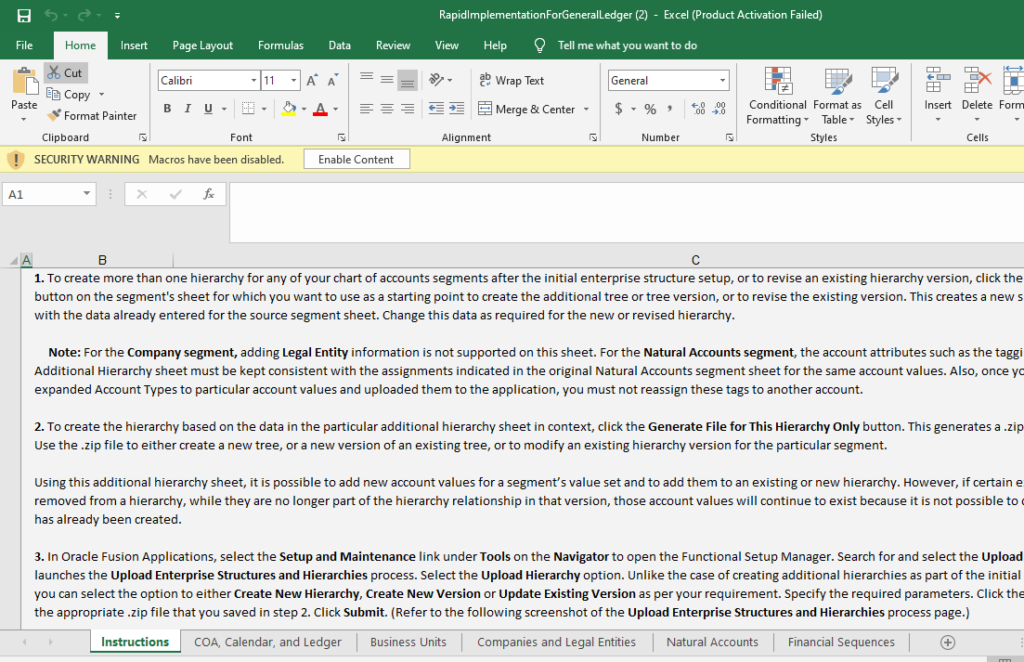
The template will be look like this

Oracle Cloud ERP

you can see all the predefined tab available to decide and enter all your setup components

Perform following steps to Create Chart of Accounts, Ledger, Legal Entities, and Business Units

For complete rapid implementation process pls check the video session here


1.Enter the data into the sheets.

2.Validate the data in the sheet

3.Convert the data in to CSV Files. Two CSV Files will be create one for Chart of Accounts and another one for ledger, legal entities and business Unit

4.First upload the CSV File for chart of Account to Oracle fusion through -Upload Chart of account option

5.Run the deployment Chart Of Account Process and wait for this program to complete successfully

6.Upload the Ledger, Legal Entity and Business Units provided the first file uploaded successfully

Before preparing and uploading your data please determine the below components properly and then plan to upload

1.Design your chart of accounts segments after analyzing your client business requirement


2.Finalize segment values and hierarchies data like parent values and child value. You have to decide this after discussing with business users and be sure to capture all the accounts values in proper format.


3.Identify your legal entities, addresses, and business units .How many you need to create for your client


4.Determine your key accounts that are used to track accounting activities, for example, retained earnings,
cash, accounts receivable, accounts payable, and revenue.


5.Determine and plan your calendar start date.


6.Finalize your primary balancing segment value, legal entity, and business unit relationships..


7. Plan your document and journal sequencing requirements.

Monday 14 June 2021

Unable to Create Supplier and its sites for business unit in Oracle Fusion Message: You can maintain sites only if you're a procurement agent with access to manage suppliers.


After Assigned Supplier Manager Abstract role to user ( enhj-test environment)

Supplier Manager ORA_POZ_SUPPLIER_MANAGER_ABSTRACT

Now User tried logged with User ID and Created New Supplier and Address as per attached screen hot, but unable to Create Site, please suggest what is next action

Message: You can maintain sites only if you're a procurement agent with access to manage suppliers.

supplier sites and still unable to see supplier site. Please see below the navigation and screen shots:

Login as krafique66 ---> Click Navigator ---> Procurement ---> Click Create Supplier

Enter Supplier Profile Detail and Click Save
Enter Address and Click Save
When I Click Sites Tab "Getting an address must exit before creating site

Solution:

The message regarding Address is misleading; User was not assigned as Procurement Agent.


1. Ensure user is setup as Procurement Agent:

1.1 Navigate: Setup and Maintenance


1.2 Search and select task: Manage Procurement Agents


1.3 Click on 'Create' (Plus sign "+" icon)

Create Agent

1.4 On Create Procurement Agent page, select a Procurement BU


1.5 Search and enter an Agent (the Agent will be the employee created for the same BU/LE).


1.6 Under Agent Access region, check that the Agent has the "Manage Suppliers" Action allowed.

Manage Supplier Privilege


1.7 Save.


2. Logout and login.

3. Navigate back to Edit Supplier page.

4. Click Sites tab.

5. Observe that the "+" icon to add a record is now available.